
Abstract
This chapter describes the most important technical aspects of the cardiac resynchronization therapy device implantation. It includes the technique of anesthesia, venous access, pocket creation, coronary sinus cannulation, left ventricular lead placement, etc. The description of the necessary tools is made to help implanting physicians become familiar with and overcome possible challenges during the procedure. We compare several techniques for every step, underlining their advantages and disadvantages. We mention a list of tip and tricks that will help physicians perform implantations and become more proficient. Numerous figures and images are used to make the explanation of the technique more comprehensive.
Keywords
- coronary sinus cannulation
- generator pocket
- left ventricular lead placement
- target vessel
- venous access
1. Introduction
In the last decades, cardiac resynchronization therapy (CRT) has become a strategic treatment for patients with advanced heart failure and left bundle branch block (LBBB).
In 1994, Cazeau et al. published their paper about the first successful cases of biventricular pacing in patients with severe congestive heart failure [1], in 1998, Daubert et al. published about transvenous approach via the coronary sinus (CS) tributaries [2] leading to fast development of various techniques and tools for CRT.
Nowadays, CRT device implantation has become a routine technique performed in many specialized centers around the globe. Nevertheless, during the procedure, some challenges and complications may arise. This is why it is important to have proper knowledge and tools.
A lot of information about the technical aspects of the CRT device implantation was gained during years: about choice of anesthesia, venous access, pocket creation, coronary sinus cannulation, left ventricular lead placement, etc.
2. Patient preparation
The success of the CRT device implantation starts with the preparation of the patient. That preoperatory part is very important. Before the procedure, we take into consideration aspects such as:
Stopping or adjusting anticoagulants
For years, bridging anticoagulation was performed before implantation in patients taking oral anticoagulation. Nowadays, some centers do not even discontinue anticoagulants before the procedure. Other centers act in a case-by-case manner, as was mentioned by AlTurki et al. [3].
The current approach in our center is:
In patients on direct oral anticoagulants, we give the last dose 24–48 hours before the procedure for Rivaroxaban and 12–24 hours for Dabigatran or Apixaban. In patients on Antivitamin K anticoagulants (Warfarin, Acenocoumarol) and international normalized ratio (INR) > 2.5 we stop them 2 days before the procedure. If INR is ~2 we do not stop the anticoagulants.
The placement of the peripheral venous catheter
The catheter has to be placed on the same side where the device is implanted.
Why is that important? It is important to have the venous catheter at that side in case the venogram of the cephalic, axillary, and subclavian veins will be necessary to guide the puncture.
Antibiotic prophylaxis
According to the current guidelines [4], it is important to give 2 g intravenous cefazolin (or 3 g in patients over 120 kg), 30–60 minutes before the procedure. In patients with known allergy to cephalosporin, 1 g of vancomycin is administered before the procedure in slow infusion (during 2 hours).
We recommend the use of the Prevention of Arrhythmia Device Infection Trial (PADIT) score to predict the risk of infection [5]. In patients with a PADIT score of ≥5 points, we continue with oral antibiotic therapy for 5–7 days after the procedure.
3. Anesthesia
CRT device implantation is a minor surgical procedure and is performed under local anesthesia.
Usually, local anesthesia with lidocaine is used. Three syringes with 4 ml Lidocaine 2% diluted with 6 ml sodium chloride 0.9% are usually enough to perform the case.
If the patient has an allergy to lidocaine, we could choose another local anesthetic such as bupivacaine or articaine.
Is the sedation necessary? It could be used because it adds comfort for both physician and patient. The sedation is obtained with 1–6 mg midazolam and 25–100 μg fentanyl, or deep sedation with continuous propofol infusion could be performed in unstable patients.
4. Venous access
An important part of the procedure is the venous access. Several different techniques of venous access exist, such as cephalic vein preparation, subclavian vein access, and axillary vein access. Which one to choose?
The cephalic vein is, in many cases, not suitable for implanting all three leads. The subclavian puncture has more risks. This is why our current approach is to use axillary vein puncture. It permits access to the extrathoracic portion of the venous system, leading to decreased risk of pneumothorax formation and avoidance of lead fractures. In our center, we had no pneumothorax complications when the axillary vein was punctured but had some when subclavian vein access was chosen [6].
How to guide the puncture?
Some operators use ultrasound to guide axillary vein puncture, some use anatomical landmarks only, and some use X-ray landmarks to guide the puncture. In our center, we use the X-ray-guided axillary vein puncture technique described by Burri et al. [7]. The target point for the pucture is the confluence of the second and third rib, where the vein is usually located. With fluoroscopy guidance, we advance the needle, pointing toward the head of the patient at a 45–60° angle to the skin surface until the blood is aspirated. To avoid pneumothorax, we take care not to cross the medial border of the first rib.
What if we cannot find the vein? It could happen if the patient is dehydrated, if there is venous spasm, or if there is venous occlusion. What to do in such a case? If the venous access is challenging, it is advisable to perform a venogram. For that is necessary to inject about 10 ml of contrast agent (iohexol 350 mg/ml) diluted with 10 ml 0.9% sodium chloride in the peripheral venous catheter. The contrast agent flows through the venous system and permits us to obtain the image of the cephalic, axillary, and subclavian veins. The venogram is latter used as a reference image to guide the vein puncture.
5. Pocket
We will not describe in detail the location of the incision. There are different approaches, taking into consideration which venous access was chosen and some cosmetic aspects.
In case a CRT device with defibrillator (CRT-D) is implanted, a subpectoral generator implantation has to be taken into consideration. It permits us to obtain better cosmetic results and avoid skin erosion, especially in patients with frailty. In patients with well-developed subcutaneous tissue, a prepectoral pocket could be created.
6. Leads placement
After obtaining the venous access, the peel-away sheath introducer is inserted in the vein, and the lead is advanced into the heart chambers.
Right ventricular (RV) lead is used for pacing, sensing, and, in case of a CRT-D device, for delivery of shocks. Right atrial (RA) lead is used for pacing and sensing. The left ventricular (LV) lead is used for pacing and sensing.
6.1 Which leads to implant first?
The majority of operators perform RV lead placement first. That approach has some specific advantages. We obtain a landmark for CS cannulation with the RV lead curve [8]. It helps us to understand the location of the CS ostium. Another advantage is that we also have the lead in place if an emergency pacing is needed, for example, in case of asystole.
6.2 Where to secure the RV lead?
It could be placed in an apical or septal position. The apical position is more stable but has more risks of cardiac perforation.
6.3 Is RA lead always necessary?
The question about RA lead could gain interest if the patient has permanent atrial fibrillation. Is it necessary to implant the RA lead? Yes, it is necessary. The RA lead has to be implanted even in patients with permanent atrial fibrillation, taking into consideration the possibility of the conversion to sinus rhythm (spontaneous or after delivery of shocks). Also, the RA lead presence is used by arrythmia discrimination algorithms of the device.
6.4 Coronary sinus cannulation
The basic lead for CRT is the LV lead that is placed in the coronary sinus. The LV lead placement is the main part of the procedure, which is sometimes technically difficult and time-consuming.
The most important and challenging step in LV lead placement is CS ostium cannulation.
How to cannulate the CS ostium?
We can use different techniques [9, 10, 11]:
direct cannulation with the CS sheath
use of the electrophysiology (EP) catheters
use of the coronarography catheters (AL2, MP catheters).
Every center or physician has his own style, but it could be performed as follows, using several consecutive techniques:
Direct cannulation with the CS (Figure 1).
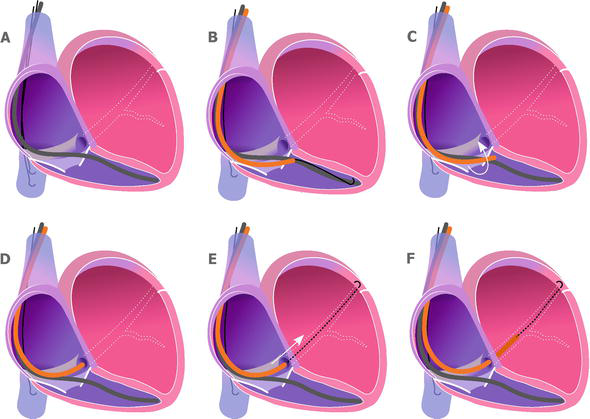
Figure 1.
Coronary sinus cannulation using coronary sinus sheath. A. The right ventricle lead is in place. Two J-shaped guidewires parked in the inferior vena cava. B. One of the guidewires is placed in the right ventricle, and the coronary sinus sheath is pushed over the guidewire on the tricuspid valve. C. The guidewire is pulled back into the coronary sinus sheath, and the sheath is rotated counterclockwise. D. The tip of the sheath at the coronary sinus ostium. E. The J-shaped guidewire is advanced into the coronary sinus. F. The coronary sinus sheath is advanced over the J-shaped guidewire and inserted into the coronary sinus.
The J-shaped guidewire is gently placed in the RV, and the CS sheath is pushed over the guidewire. We aim to place the tip of the sheath over the tricuspid valve (near the RV lead curve) (Figure 1B). Then we pull back the guidewire. After that, we gently rotate counterclockwise and pull back the CS. With that rotation, the tip of the CS sheath usually jumps in the CS ostium. We confirm the engagement by injecting some contrast, and if confirmed, cannulate the CS with the guidewire and thereafter with the CS sheath over the wire.
The use of the EP catheters (Figure 2).
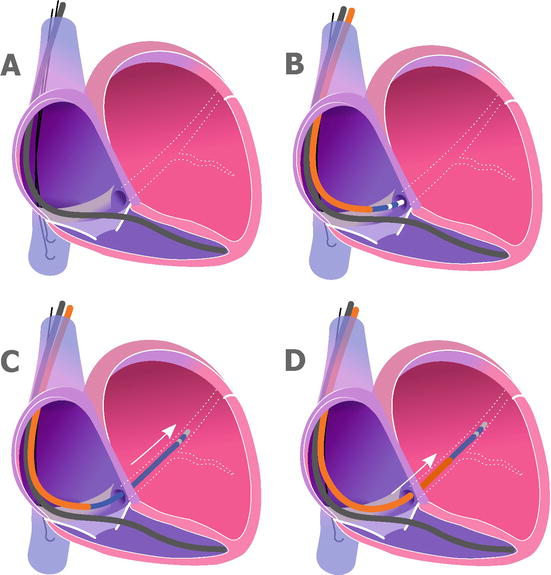
Figure 2.
Coronary sinus cannulation using electrophysiology catheter. A. The right ventricle lead is in place. Two J-shaped guidewires were parked in the inferior vena cava. B. The coronary sinus sheath is placed in the right atrium. Using electrophysiology catheter, the ostium of the coronary sinus is located. C. Cannulation of the coronary sinus using the electrophysiology catheter. D. The coronary sinus sheath is advanced over the electrophysiology catheter into the coronary sinus.
To perform that type of cannulation, we insert 6F or 7F deflectable (or non-deflectable) EP catheters inside the CS sheath. The shape of the catheter could be changed adjusting to the CS ostium position. Also, the tip of EP catheter is round. Therefore, the risk of CS dissection is lower. Some operators use not only anatomical landmarks to guide the cannulation but also electrograms obtained from the EP catheter. After cannulating the CS with the EP catheter, we push the CS sheath over the EP catheter inside the CS.
Another technique to find the CS ostium in difficult cases is the use of small amount of contrast agent. The operator is gently moving the tip of the CS sheath and injects small amounts of contrast. When the CS ostium is located, it is directly cannulated with the CS sheath or with the J-shaped guidewire.
Coronarography with venous phase. When we cannot find the ostium with the techniques mentioned above, we can think about performing coronarography with the venous phase. It allows us to understand the CS anatomy and to use the obtained venogram as a reference image.
The telescopic method. In some challenging cases, the operator can use additional catheters inside the main CS sheath. Different types of coronarography catheters such as AL2, AL3, and MP could be used to enter the CS ostium (Figure 3).
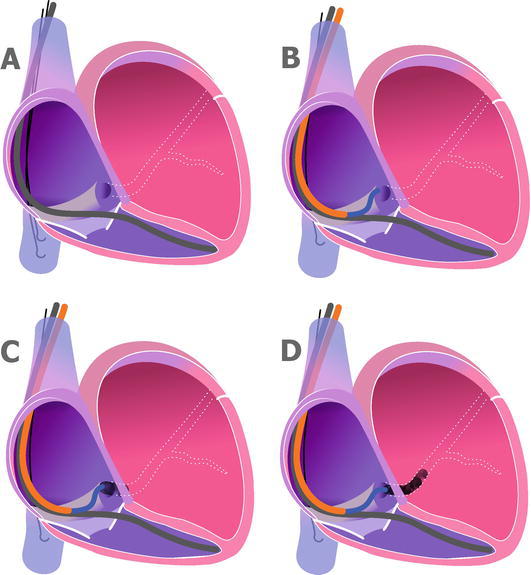
Figure 3.
Coronary sinus cannulation using telescopic method. A. The right ventricle lead is in place. B. The coronary sinus sheath is placed in the right atrium. The AL2 or AL3 catheter is advanced to reach the coronary sinus ostium. C. Some contrast is injected to confirm the engagement of the coronary sinus ostium. D. More contrast is used to confirm stable position. After that, the J shaped guidewire could be inserted deep into the coronary sinus.
Sometimes, even when using all the mentioned techniques, we cannot engage the CS ostium. What to do in such a case? We have at least three options: to postpone the procedure for other session, use left bundle branch (LBB) area pacing, or refer to cardiac surgeons for epicardial LV pacing.
6.5 Target vessel
In the majority of cases, we successfully cannulate the CS. Our next step in LV lead placement is choosing the target vessel. How do we perform that? The vein is selected by performing the venogram of the CS (with or without CS balloon) in the left anterior oblique 30° projection.
The target area for LV lead placement is posterolateral or lateral branches.
There could be cases without any branch in posterolateral or lateral area. What to do in such a case? We aim for anterolateral branches. Rarely, but there could be cases where there are no suitable vessels for LV lead placement. The cause could be a complete absence of the branches or the presence of very small branches. What to do in such a case? We have at least two options: epicardial implantation of the bipolar lead on the LV lateral wall or consider LBB area pacing.
It is necessary to keep in mind that epicardial leads or LBB area pacing leads are bipolar only and, thereby, cannot be directly connected to quadripolar devices. This is why we always keep in our hospital a CRT device with a bipolar LV lead port.
How do you insert the lead into the target vein? We cannulate the target branch with 0.014-inch floppy wire and advance the LV lead over the wire.
Sometimes, the cannulation of the target branch is challenging due to the angulation of the vessel. In such a case, we can use an angiographic catheter (e.g., a 4F vertebral catheter) to cannulate that branch and send the floppy inside.
You must keep in mind that in some difficult cases there is not enough stability of the CS sheath to deliver the LV lead. In that case, we could solve the issue using extra support 0.014 ich floppy guidewires to send the LV lead in the target vein.
6.6 Types of the leads
What type of lead to choose?
There are several types, but experienced operators keep in mind some basic things.
If we are talking about CRT-D devices, a question about the number of coils in RV lead will arise. What is the best choice, single coil RV lead or dual coil RV lead?
For RV is advisable to use only single coil RV leads. The current evidence is that there are no additional benefits to the use of dual coil RV leads, and additional difficulties could arise if RV explantation is necessary in case of device infection [12, 13].
What about bipolar vs. quadripolar LV leads for CRT?
Quadripolar LV lead is the preferred choice with well-known advantages [14].
The use of the quadripolar LV leads offers much more vector possibilities for LV pacing. We could choose the vector with the lowest threshold, which will save battery life. We can change the vector if there is diaphragmatic stimulation or if there is loss of LV capture.
What about the shape of the LV lead? There are many types of LV lead shapes on the market: straight, S shape, L shape, etc. One of the best shapes for LV leads is the S shape. It permits us to have easy access of the lead to the target branch and to have good stability after implantation.
7. Types of the devices
The devices could be divided into pacemakers, referred as CRT-P and defibrillators, referred as CRT-D. The CRT-D devices could deliver high-energy interventions called shocks to treat severe arrhythmias such as ventricular fibrillation or ventricular tachycardia.
The devices could be MRI-compatible or not. They could be with bipolar LV leads or quadripolar LV leads, as was discussed earlier.
8. Complications
The CRT implantation could be a cause of many complications. Some of the complications could appear during procedure, and some are postoperative.
During the procedure, the physician must be attentive to avoid CS dissection or rupture, cardiac tamponade, and hemodynamic instability.
In the postoperative period, we have to avoid and to early detect and treat complications such as pocket hematoma, lead dislodgement, and pocket infection.
8.1 Hematoma
The pocket hematoma increases the risk for subsequent pocket infection [4]. The Bridge or Continue Coumadin for Device Surgery Randomized Controlled Trial (BRUISE CONTROL) proved that pocket hematoma is an independent risk factor for subsequent device infection [15].
Therefore, it is of utmost importance to avoid postoperative pocket hematoma.
To do so, it is advisable to not use bridge therapy with anticoagulants [3]. As an option, electrocautery could be used to perform meticulous hemostasis. And if necessary, use 500–1000 mg local tranexamic acid to obtain hemostasis [16].
8.2 Coronary sinus dissection or rupture
CS dissection or rupture is a known major complication during LV lead implantation (Figure 4).
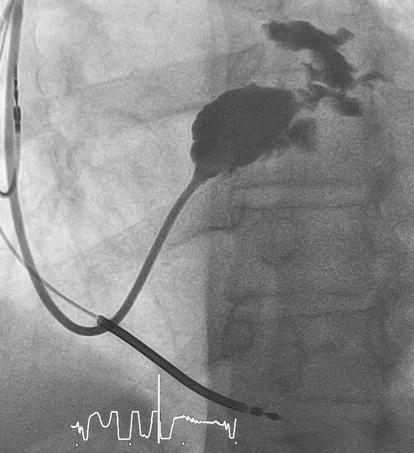
Figure 4.
Coronary sinus rupture. (Figure by Darciuc et al. [
How to prevent CS dissection? Manipulate the CS sheath and the guidewires gently. Please do not introduce the contrast agent in CS with high pressure if the sheath is perpendicular to CS wall. Check first with a small amount of contrast.
What should we do if we have dissection or rupture? Just take into consideration that usually, after 3–4 weeks, the dissection or rupture is healed, so the procedure could be continued in the postponed session.
8.3 Lead’s dislodgement
To avoid lead dislodgement, it is preferable to use RA and RV leads with active fixation. Also, as we mentioned earlier, it is better to use S-shaped LV leads.
To avoid Twiddler syndrome, is important to secure the generator of the CRT-P or CRT-D inside the pocket.
We recommend that our patient avoid raising the elbow higher than the shoulder level at the surgery side for 6 weeks.
8.4 Free wall perforation and cardiac tamponade
Some patients could have apical aneurysms of the LV or very thin myocardium. Think about that when using the RV lead with active fixation. Consider securing the RV lead in septal region and avoid apical region.
8.5 Infection
Infection is an unpleasant complication, causing significant morbidity and mortality.
Infection rates are higher with device replacement or upgrade procedures [17]. As was reported by Olsen T. et al., the lifetime risk of system infection in patients with a pacemaker is 1.19%, with an implantable cardioverter defibrillator is 1.91%, with a CRT-P is 2.18%, and with a CRT-D is 3.35% [18].
To avoid infection, it is necessary to perform adequate patient preparation (antibiotic prophylaxis and skin preparation), use good surgical techniques, and avoid prolonged procedures to prevent hematoma formation (Figure 5).
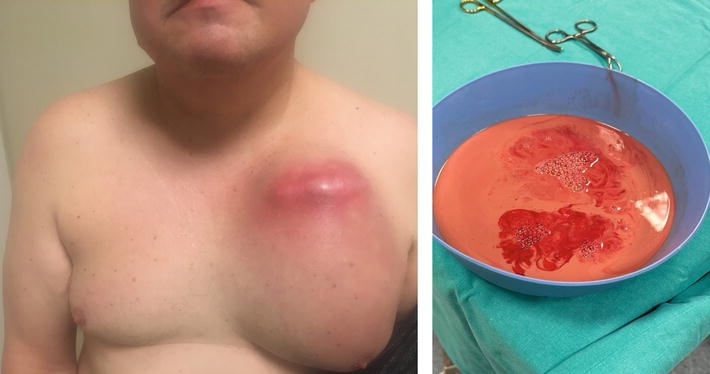
Figure 5.
Pocket infection. The cardiac resynchronization therapy device was implanted in 2019. The patient did not visit the device clinic for about 4 years. In 2023, he had a chest trauma, and a hematoma appeared in the region of the CRT-D generator. Thereafter, the hematoma became infected, and a phlegmon appeared. The system was successfully removed.
9. Follow-up
Is tremendously important to follow up with the patients.
During the follow-up visit, the physician:
Is checking the appearance of the pocket.
Is checking the percentage of biventricular pacing.
Is performing CRT optimization by adjusting atrioventricular and ventriculo-ventricular delay. It could be performed using electrocardiography or echocardiography guidance.
In CRT-D devices, is analyzing the events and the delivered therapies. Readjust the therapies as necessary.
10. Conclusions
CRT implantation is a challenging procedure that consists of many steps. Without proper planning and training, there could be challenges difficult to overcome.
EP specialists should have a backup plan for every single obstacle in CRT implantation.
It is important to develop the proper strategy to face all the challenges.
Acknowledgments
The author acknowledges the contribution to the current work of the previously published paper by Darciuc et al. [6], used under the Creative Common Attribution License.
References
- 1.
Cazeau S, Ritter P, Bakdach S, Lazarus A, Limousin M, Henao L, et al. Four chamber pacing in dilated cardiomyopathy. Pacing and Clinical Electrophysiology. 1994; 17 (11 Pt. 2):1974-1979. DOI: 10.1111/j.1540-8159.1994.tb03783.x - 2.
Daubert JC, Ritter P, Le Breton H, Gras D, Leclercq C, Lazarus A, et al. Permanent left ventricular pacing with transvenous leads inserted into the coronary veins. Pacing and Clinical Electrophysiology. 1998; 21 (1 Pt. 2):239-245. DOI: 10.1111/j.1540-8159.1998.tb01096.x - 3.
AlTurki A, Proietti R, Birnie DH, Essebag V. Management of antithrombotic therapy during cardiac implantable device surgery. Journal of Arrhythmia. 2016; 32 (3):163-169. DOI: 10.1016/j.joa.2015.12.003 - 4.
Glikson M, Nielsen JC, Kronborg MB, et al. 2021 ESC guidelines on cardiac pacing and cardiac resynchronization therapy [published correction appears in Eur Heart J. 2022 May 1;43(17):1651]. European Heart Journal. 2021; 42 (35):3427-3520. DOI: 10.1093/eurheartj/ehab364 - 5.
Birnie DH, Wang J, Alings M, et al. Risk factors for infections involving cardiac implanted electronic devices [published correction appears in J Am Coll Cardiol. 2020 Feb 25;75(7):840-841] [published correction appears in J Am Coll Cardiol. 2020 Aug 11;76(6):762]. Journal of the American College of Cardiology. 2019; 74 (23):2845-2854. DOI: 10.1016/j.jacc.2019.09.060 - 6.
Darciuc R, Boiciuc I, Ivanov D, Eraslan H, Batrinac A, Diker E. Technique of the cardiac resynchronization therapy device implantation. Medical Research Archives. 2023; 11 (7.1). DOI: 10.18103/mra.v11i7.1.4057 - 7.
Burri H, Sunthorn H, Dorsaz PA, Shah D. Prospective study of axillary vein puncture with or without contrast venography for pacemaker and defibrillator lead implantation. Pacing and Clinical Electrophysiology. 2005; 28 (Suppl. 1):S280-S283. DOI: 10.1111/j.1540-8159.2005.00039.x - 8.
Cheng CM, Huang JL, Wu TJ, et al. Novel tips for engaging the coronary sinus guided by right ventricular lead. Europace. 2012; 14 (12):1754-1758. DOI: 10.1093/europace/eus192 - 9.
Gunes H, Aksu E, Nacar H, Kerkutluoglu M, Gunes H, Ozgul S. What is the most appropriate method for coronary sinus cannulation? The telescopic method or the electrophysiologic method? PLoS One. 2018; 13 (9):e0203534. Published 2018 Sep 14. DOI: 10.1371/journal.pone.0203534 - 10.
Katritsis DG. A novel technique for placement of coronary sinus pacing leads in cardiac resynchronization therapy. Europace. 2007; 9 (10):878-879. DOI: 10.1093/europace/eum146 - 11.
Worley SJ. Challenging implants require tools and techniques not tips and tricks. Cardiac Electrophysiology Clinics. 2019; 11 (1):75-87. DOI: 10.1016/j.ccep.2018.11.003 - 12.
Aoukar PS, Poole JE, Johnson GW, et al. No benefit of a dual coil over a single coil ICD lead: Evidence from the sudden cardiac death in heart failure trial. Heart Rhythm. 2013; 10 (7):970-976. DOI: 10.1016/j.hrthm.2013.03.046 - 13.
Sunderland N, Kaura A, Murgatroyd F, Dhillon P, Scott PA. Outcomes with single-coil versus dual-coil implantable cardioverter defibrillators: A meta-analysis. Europace. 2018; 20 (3):e21-e29. DOI: 10.1093/europace/euw438 - 14.
Rijal S, Wolfe J, Rattan R, et al. Lead related complications in quadripolar versus bipolar left ventricular leads. Indian Pacing and Electrophysiology Journal. 2017; 17 (1):3-7. DOI: 10.1016/j.ipej.2016.10.008 - 15.
Essebag V, Verma A, Healey JS, Krahn AD, Kalfon E, Coutu B, et al. Clinically significant pocket hematoma increases long-term risk of device infection: Bruise control infection study. Journal of the American College of Cardiology. 2016; 67 (11):1300-1308. DOI: 10.1016/j.jacc.2016.01.009 - 16.
Beton O, Saricam E, Kaya H, et al. Bleeding complications during cardiac electronic device implantation in patients receiving antithrombotic therapy: Is there any value of local tranexamic acid? BMC Cardiovascular Disorders. 2016; 16 :73. Published 2016 Apr 22. DOI: 10.1186/s12872-016-0251-1 - 17.
Rattanawong P, Kewcharoen J, Mekraksakit P, Mekritthikrai R, Prasitlumkum N, Vutthikraivit W, et al. Device infections in implantable cardioverter defibrillators versus permanent pacemakers: A systematic review and meta-analysis. Journal of Cardiovascular Electrophysiology. 2019; 30 (7):1053-1065. DOI: 10.1111/jce.13932 - 18.
Olsen T, Jørgensen OD, Nielsen JC, Thøgersen AM, Philbert BT, Johansen JB. Incidence of device-related infection in 97 750 patients: Clinical data from the complete Danish device-cohort (1982-2018). European Heart Journal. 2019; 40 (23):1862-1869. DOI: 10.1093/eurheartj/ehz316